Showing posts with label Python. Show all posts

Friday, October 2, 2015

Python | Simple PyQt5 GUI example with QSS Styling

Hello All,

I started reading about PyQt I decide to try the framework. Till now I had only worked with Java Swing. But after trying I seriously think that I might forget using Java Swing. I loved using PyQt5 since it is very easy and quite powerful, fast, and flexible. It does have more GUI features than Java (I don't know but with my experience in Java, I find Qt to be more mature.)

Since I have moved to Python 3.4 and hence decided to use the latest version and that is PyQt5 instead of PyQt4.

Today I will give you a little snippet that I wrote just as a part of learning the framework. I can't tell much about the efficiency of my code since I have very less experience with Python and Qt. So, if someone more experienced will comment or criticize my code then I am always open and would be very happy as well.

To develop this little GUI I used GridLayout and so the GUI and its widgets are adjustable with the base window. I used QSS to design the gui with colors.

QSS : Its a variant of CSS with most of the properties intersecting with CSS styles and specially designed to work and design the Qt guis and widgets. But instead of HTML tags we use the Widgets class name for styling them, like :- QWidget, QLineEdit, QLabel, QPushButton etc. etc.

QSS is a feature which I loved the most since everything else was pretty much the same with Java Swings.

Screenshot

[Image: H7uLJPu.png] 

QSS File Code

QWidget {
   background-color: #222222;
}

QLineEdit {
   background-color: aliceblue;
   color: #618b38;
   font-style: italic;
   font-weight: bold;
}

QLabel {
   background-color: #222222;
   color: #618b38;
}

QPushButton {
   background-color: #8b0000;
   color: #ffffff;
   border-radius: 5px;
   border-style: none;
   height: 25px;
}


Code for GUI

from PyQt5 import QtCore, QtWidgets

__author__ = "Psycho_Coder"


# noinspection PyUnresolvedReferences
class MainUiWindow(object):

   def __init__(self):

       #Main Window
       self.centralwidget = QtWidgets.QWidget(MainWindow)

       """
       Using Grid Layouts for Widgets Alignment
       """
       #Grid Layout for Main Grid Layout
       self.maingrid_layout = QtWidgets.QGridLayout(self.centralwidget)

       #Grid Layout for Result Section Layout
       self.resultgird = QtWidgets.QGridLayout()

       #Grid Layout for Information section
       self.infogrid = QtWidgets.QGridLayout()

       #Grid Layout for holding all the widgets in place
       self.outergrid = QtWidgets.QGridLayout()

       #Button to clear all test input
       self.clearall = QtWidgets.QPushButton(self.centralwidget)

       #Button to show the final result by append
       self.showres = QtWidgets.QPushButton(self.centralwidget)

       #Horizontal layout to hold the result section horizontally
       self.horizontal_layout = QtWidgets.QHBoxLayout()

       """
       Show results widgets
       """
       self.fullname = QtWidgets.QLabel(self.centralwidget)
       self.result = QtWidgets.QLabel(self.centralwidget)

       """
       Get Names info section
       """
       self.firstname = QtWidgets.QLabel(self.centralwidget)
       self.lastname = QtWidgets.QLabel(self.centralwidget)

       #TextBox to get user input
       self.fname = QtWidgets.QLineEdit(self.centralwidget)
       self.lname = QtWidgets.QLineEdit(self.centralwidget)

   def init_gui(self, MainWindow):

       MainWindow.setObjectName("MainWindow")

       MainWindow.setStyleSheet(open("style.qss", "r").read())
       MainWindow.setAutoFillBackground(True)
       MainWindow.resize(328, 166)

       self.centralwidget.setObjectName("centralwidget")

       self.maingrid_layout.setObjectName("maingrid_layout")
       self.outergrid.setObjectName("outergrid")
       self.infogrid.setObjectName("infogrid")

       self.firstname.setObjectName("firstname")
       self.infogrid.addWidget(self.firstname, 0, 0, 1, 1)

       self.fname.setObjectName("fname")
       self.infogrid.addWidget(self.fname, 0, 1, 1, 1)

       self.lastname.setObjectName("lastname")
       self.infogrid.addWidget(self.lastname, 1, 0, 1, 1)

       self.lname.setObjectName("lname")
       self.infogrid.addWidget(self.lname, 1, 1, 1, 1)

       self.outergrid.addLayout(self.infogrid, 0, 0, 1, 1)

       self.fullname.setObjectName("fullname")

       self.result.setMaximumSize(QtCore.QSize(140, 16777215))
       self.result.setObjectName("result")

       self.resultgird.setObjectName("resultgird")
       self.resultgird.addWidget(self.fullname, 0, 0, 1, 1)
       self.resultgird.addWidget(self.result, 0, 1, 1, 1)

       self.outergrid.addLayout(self.resultgird, 1, 0, 1, 1)

       self.showres.setObjectName("showres")
       self.clearall.setObjectName("clearall")

       self.horizontal_layout.setObjectName("horizontal_layout")
       self.horizontal_layout.addWidget(self.showres)
       self.horizontal_layout.addWidget(self.clearall)

       self.outergrid.addLayout(self.horizontal_layout, 2, 0, 1, 1)
       self.maingrid_layout.addLayout(self.outergrid, 0, 0, 1, 1)

       MainWindow.setCentralWidget(self.centralwidget)

       self.retranslate_gui(MainWindow)

       #Add signals of clear to LineEdit widgets to clear the texts
       self.clearall.clicked.connect(self.result.clear)
       self.clearall.clicked.connect(self.lname.clear)
       self.clearall.clicked.connect(self.fname.clear)
       self.showres.clicked.connect(self.__name)

       QtCore.QMetaObject.connectSlotsByName(MainWindow)

   def __name(self):
       name = self.fname.text() + " " + self.lname.text()
       self.result.setText("" + name + "")

   def retranslate_gui(self, MainWindow):
       _translate = QtCore.QCoreApplication.translate
       
       MainWindow.setWindowTitle(_translate("MainWindow", "Name Concatenation"))
       self.lastname.setText(_translate("MainWindow", "Last Name :"))
       self.firstname.setText(_translate("MainWindow", "First Name :"))
       self.fullname.setText(_translate("MainWindow", "Concatenated Name :-"))
       self.result.setText(_translate("MainWindow", ""))
       self.showres.setText(_translate("MainWindow", "Show Name!"))
       self.clearall.setText(_translate("MainWindow", "Clear All"))

if __name__ == "__main__":
   import sys
   app = QtWidgets.QApplication(sys.argv)
   MainWindow = QtWidgets.QMainWindow()
   ui = MainUiWindow()
   ui.init_gui(MainWindow)

   MainWindow.show()
   sys.exit(app.exec_())


I hope you like this short snippet (not short I guess :troll:) and probably you learnt a bit by observation how to design GUIs and use layouts properly and how the hierarchy should be followed. Share this post. Thank you.
Continue Reading →

Sunday, September 20, 2015

Python CodeHack | ROT13 function in different ways


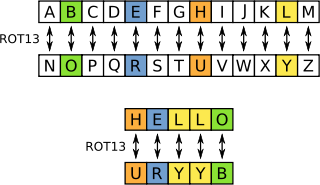
"ROT13 ("rotate by 13 places", sometimes hyphenated ROT-13) is a simple letter substitution cipher that replaces a letter with the letter 13 letters after it in the alphabet. ROT13 is a special case of the Caesar cipher, developed in ancient Rome." -- Wikipedia

In this post I will share the different ways to encode a string using ROT13 in Python, or better say in how mane ways you can do so in Python. We will show three ways to perform ROT13. 

1. First Approach
We make use of the maketrans function in string module.

import string

def rot13(text):
   if isinstance(text, str):
       rot13 = string.maketrans("ABCDEFGHIJKLMabcdefghijklmNOPQRSTUVWXYZnopqrstuvwxyz",
                                "NOPQRSTUVWXYZnopqrstuvwxyzABCDEFGHIJKLMabcdefghijklm")
       
       return string.translate(text, rot13)
   else:
       raise ValueError("The parameter must be a string.")

2. Second Approach
But the problem with the above solution is that maketrans was removed in Python3. Instead we can use bytes.maketrans() for the purpose, so in order to obtain a more generalised solution we can do it as follows :-

import string
import sys


def rot13(text):
    if isinstance(text, str):
        if sys.version[0] == "2":
            rot13_data = string.maketrans("ABCDEFGHIJKLMabcdefghijklmNOPQRSTUVWXYZnopqrstuvwxyz",
                                          "NOPQRSTUVWXYZnopqrstuvwxyzABCDEFGHIJKLMabcdefghijklm")
            return string.translate(text, rot13_data)
        elif sys.version[0] == "3":
            rot13_data = bytes.maketrans(b"ABCDEFGHIJKLMabcdefghijklmNOPQRSTUVWXYZnopqrstuvwxyz",
                                         b"NOPQRSTUVWXYZnopqrstuvwxyzABCDEFGHIJKLMabcdefghijklm")
        return text.translate(rot13_data)
    else:
        raise ValueError("The parameter must be a string.")

You can simple send your rot13 cipher/plaintext and it will encode or decode accordingly.
3. Third Approach

Another better technique is to use codecs module and use the in built rot_13 encoding scheme which is the same. Also its more preferable.

import codecs

cipher = codecs.encode("Natsu Dragneel", "rot_13")
print(cipher)

plain = codecs.decode(cipher, "rot_13")
print(plain)
Continue Reading →

Python Code for Maximum Sum Subarray Problem

"In computer science, the maximum subarray problem is the task of finding the contiguous subarray within a one-dimensional array of numbers (containing at least one positive number) which has the largest sum. For example, for the sequence of values −2, 1, −3, 4, −1, 2, 1, −5, 4; the contiguous subarray with the largest sum is 4, −1, 2, 1, with sum 6." --Wikipedia

A linear time solution was proposed by Jay Kadane and was hence forth named as Kadane's Algorithm. The algorithm paradigm followed is Dynamic Programming. Here I have given you the python code for this problem.


Continue Reading →

Monday, September 14, 2015

FAIDDS | Forensic Acquisition Information and Drive Data Script

Forensic Acquisition Information and Drive Data Script

The script provides a simple way to gather drive information and acquire a drive from a specified device file to the local directory. For this script to work you must run it as Administrator.

Use the -d argument to specify the device or file path. Using -lh you can get the list of hashes available. These two options are mutually exclusive.
You can get sample reports in the Sample directory.

Get the Script

You can get the script easily by either downloading the project release, extracting the content and then running the script, alternatively clone the project using Git as shown in the image below.


After you have done so, move to the faidds directory and run the script faidds.py. Follow the example usages stated below for better understanding of how to use the script.
See all the available options

python faids.py --help

usage: faidds.py [-h] [-d DRIVE] [-D] [-c CHUNK] [-s SERIAL] [-m HASHES] [-lh]
             [-dcfldd]

Forensic Acquisition Information and Drive Data Script. This script provides a
simple way to gather drive information and acquire a drive from a specified
device file to the local directory. For this script to work you must run it as
Administrator. Use the -d argument to specify the device or file path. Using
-lh you can get the list of hashes available. These two options are mutually
exclusive.

optional arguments:
  -h, --help            show this help message and exit
  -d DRIVE, --drive DRIVE
                        Device file to acquire. Example: /dev/sda
  -D, --DEBUG           Debug mode will be activated. All the system calls are
                        printed
  -c CHUNK, --chunk CHUNK
                        Size to split file in GB (1024*1024*1024)
  -s SERIAL, --serial SERIAL
                        User specified serial number. Default is to find
                        serial number in drive info.
  -m HASHES, --hashes HASHES
                        List of hash algorithms to use. Comma separated with
                        no spaces. (default: md5)
  -lh, --list_hashes    List all the Hashes
  -dcfldd, --dcfldd     Use dcfldd to acquire image. (default: dc3dd)

Example Usage

Acquire a drive image and gather information

python faids.py -d /dev/sdb1 
Acquire a drive image and get multiple hash results

Write the hashes as Comma separated value.

python faids.py -d /dev/sdb1 -m md5,sha256,sha512
Get list of all available hashes

python faids.py -lh
Available hashes: md5, sha1, sha256, sha384 and sha512

Note

This script was adopted from here. I have refactored it and made it more readable with a better documentation and I plan to add some more new features later.

The code is hackable and you can add many more new features to the script. I hope you liked this post. Share this post, and leave a comment.

Thank you,
Sincerely,
Psycho_Coder.
Continue Reading →

Sunday, September 6, 2015

Peter de Jong Attractor in Python

It's pretty simple and I have specially given the code in python which demonstrates the concept. For details on Attractors please refer wikipedia. I have used the Python pygame module for graphics.

Here's the end result:-

[Image: GOVr9W9.png]

Here's the code:


I have used two custom fonts as you can see in the code above. You can get them from here and here. You can use either system font or download two new fonts and put them in the same execution directory. Make sure you edit the code with proper font names. 

self.xn, self.yn = ( sin( self.constants["a"] * self.yn ) - cos ( self.constants["b"] \
                                   * self.xn ) ), ( sin( self.constants["c"] * self.xn ) - cos( self.constants["d"] * self.yn ) )
                   #  xn, yn = ( d * sin( a * xn ) - sin ( b * yn ) ), ( c * cos( a * xn ) + cos( b * yn ) )
                   self.coords.append( ( self.xn, self.yn ) )
                   pygame.draw.circle( self.screen, self.grayshade , ( self.width // 2 + \
                                           int( 120 * self.xn ), self.height // 2 + int( 120 * self.yn ) ), 1, 1 )
Changing the constants a,b, c and varying the number of iteration you can create many more custom shapes. So be creative and start hacking!
Continue Reading →

Monday, July 20, 2015

Bouncing Box animation in Python using PyGame

Bouncy is a class which demonstrates Bouncing rectangle animation which options like resolution, bouncy rectangle size, speed. Whenever it collides with the borders or wall it plays a sound. The code doesn't have any Magic Numbers, everything has been named pretty well so that it is readable to most and many error handling cases has been handled (These being the reason that the code is long else it can be reduced).


How to use ?

Just initialize the class with the parameters. if you don't give any params a default value is taken.


Parameters :-

1. resolution : Takes a tuple of values for Screen Size like (800, 600). Default Value : (640, 480)
2. rectobj_size : Takes a tuple of values for rectangle object size like (40, 30). Default Value : (50, 50)
3. speed : Animation Speed. Min value 1

Example :-

Bouncy( ( 600, 400 ), ( 40, 40 ), 5 ) or Bouncy( resolution = ( 600, 400 ), rectobj_size = ( 40, 40 ), speed = 5 )

Code:


Continue Reading →

Sunday, July 19, 2015

Create basic shapes using PyGame

We create a basic window in Python and draw the basic geometrical shapes like Rectangle, Circle, Line, ellipse or polygon etc. You should have pygame installed else the code will not execute and throw an ImportError.


Continue Reading →

Tuesday, June 23, 2015

Modified Atbash Cipher code in Python

English: Icon from Nuvola icon theme for KDE 3...
(Photo credit: Wikipedia)

The Atbash cipher is a very specific case of a Monoalphabetic substitution cipher where the letters of the alphabet are reversed. In other words, all A's are replaced with Z's, all B's are replaced with Y's, and so on. 

I modified this general scheme somewhat and added support for encrypting digits and special characters too to make it stronger because reversing the alphabet twice will get you actual alphabet, you can encipher and decipher a message using the exact same algorithm.
Example:

Plaintext  : Ex094, You are a very Nice Guy!
Ciphertext: [liZeB?~uo?8r4?8?n4rk?_064?-okX

class AtBash:

   def __init__(self):
       self.alphabets = ' ABCDEFGHIJKLMNOPQRSTUVWXYZabcdefghijklmnopqrstuvwxyz0123456789~!@#$%^&*()_+|:"<>-=[];,.?/`'

   def encode(self, plaintext):
       cipher = ""
       for i in plaintext:
           index = self.alphabets.index(i)
           cipher += self.alphabets[abs(len(self.alphabets) - index - 1) % len(self.alphabets)]
       return cipher

   def decode(self, ciphertext):
       return self.encode(ciphertext)


if __name__ == "__main__":
   atbash = AtBash()

   enc = atbash.encode("Hello World!")
   print(enc)

   dec = atbash.decode(enc)
   print(dec)

I hope you liked this post. Share this post. Thank you.
Continue Reading →

Sunday, June 21, 2015

Lyrister - Song Lyrics Scrapper

Hello Everyone,

Today I will share a little snippet I wrote to get scrap or download lyrics of your favourite songs and save on your hard drive as .txt files.

I have used python 2.7.6 for this and have used the requests python package for web requests

You can get the code here : https://github.com/AnimeshShaw/Lyrister

I hope I have taken care of most things that may cause you problems.

How to Use ?

On the terminal run the following and follow the instructions that follow:-

python lyrister.py

You have the option of giving command line arguments as the parameters. The following format is to be followed :-

python lyrister.py <name-of-song> <path-of-directory> <filename>

It takes three parameters. The first parameter is the name of the song for which you want to download the lyrics. Please note that if you intend to write the song name with spaces then use double quotes and your directory path must end with separator.

Example 1:

Here we download the song Carnival by Natalie Merchant. Since we have not provided the song name with space there is no problem.

python lyrister.py carnival /home/psychocoder/ carnivallyric

Example 2:

Here we download the song Carnival Of Rust by "Poets Of Fall". Since we have not provided the song name with space there is no problem.

Code:
python lyrister.py "carnival of rust" /home/psychocoder/ CarnivalOfRust

If a file with the same name exists in the directory then it won't let to save the song and will ask you to try another name to download the lyric.

If you want to save the file in some directory which doesn't have write permission then you wont be able to save the lyrics.

These checking have been done already and I hope the rest you can understand by yourself. I have given a good description for every step in the code itself and also how to resolve the errors. I hope you enjoy.

[Image: gkHR8qU.png?1]
Continue Reading →

Fuzzy String Matching or Searching with Python Code

[Image: hoRwHam.png]
Hello everyone, I have been recently reading about Text Mining and Natural Language Processing (NP). So, I will be sharing a few articles on TextMining from now on. So, that you can have an interest in this beautiful field of Computer Science.

Prerequisites

In order to understand the main content of the article you need some prerequisites which are as follows :- 

  • Familiar with Programming.
  • Know at least one programming language.
  • Basics of Python (Optional but Recommended)
  • Have some prior exposure to Data Structures and algorithmic techniques like Backtracking, Dynamic Programming etc.
  • Have some gray cells and have patience.
  • Passion for Computer Science.
Let's Start,


The first question that should arise in your mind when you hear the term TextMining is What is TextMining and What does it do ? hence we will understand first what is Text or Data Mining. Lets proceed.

Text Mining or Data Mining

Text mining, also referred to as text data mining, roughly equivalent to text analytics, refers to the process of deriving high-quality information from text. High-quality information is typically derived through the devising of patterns and trends through means such as statistical pattern learning.

Text mining usually involves the process of structuring the input text (usually parsing, along with the addition of some derived linguistic features and the removal of others, and subsequent insertion into a database), deriving patterns within the structured data, and finally evaluation and interpretation of the output.

To explain it simply

Data Mining is a processing of locating or finding important expression, phrases or sentences or events from data or text which can be further processed to get more useful information. Even though data mining tries to collect information from data, its different from Information Retrieval, instead of the fact that Data Mining, Information Retrieval or Natural Language Processing are often connected together and misunderstood as one, I will explain how they are different some other time and not here. If you wanna develop an application based on Text or where you have to deal with large amount of data and you need an intelligent system which will classify the data and sorts them into different categories or do different processes then you need these concepts a lot.

Real life examples of Data Mining

1. Google Search : Whenever you starting writing a query it automatically suggests the possible search queries. How does it do ? They use these concept to derive the most probable search query.

2. Spell Correction : You might have seen that if you type wrong spelling's most search engines or word processors mark them with a red underline which means that you have a spelling error. MS Word or Android apps has automatic spell correction. They use these NLP and Text Mining concepts. See the image it will clear a lot of doubts. See how Google does spell correction and the search results are an example of the query I entered.


3. Amazon or Online Shopping Stores : Most of you must have done online shopping a lot. Whenever you visit a site for the first time and search for some specific product. You see some thing written as recommended for you. Next time when you visit that site you might be astonished to see that the products you see when you open the webpage are similar to what you had searched in your last visit but more refined. So, how does it work ? the earlier mentioned concepts are used for these. They collect your browsing history and process the data and finally show you the most recommended products.

There are thousands of examples just Google for it :P
I hope by now you have somewhat understood what is data or text mining. Now we will come to today's real discussion that is fuzzy string searching. So lets continue.


Today's Discussion

In this section we discuss about String matching or string similarity algorithms. We will discuss the following algorithms today.

1. Damerau-Lavenshtein Distance.
2. Levenshtein Distance.
3. Wagner-Fisher Algorithm.


Strings are among the most important elements of computer science. There are literally 100's of research papers on strings. String searching and matching is one of he most important part in Text Processing and text analysis, since all the data to intelligent systems are fed as string. Strings are nothing but a sequence of characters joined together.

Fuzzy String Searching or Fuzzy String Matching

Fuzzy string search algorithms are algorithms that are used to match either exactly or partially of one string with another string. So, what exactly does fuzzy mean ? 

Fuzzy by the word we can understand that elements that aren't clear or is like an illusion. Therefore, in short we say that when there is a set of n elements and another set of m elements and they both have partially same elements then we can say that the relation between them is fuzzy.

(Funny example Most women have a fuzzy thinking that their men are cheating on them but instead of taking it as fuzzy they take it for granted :P)

By Fuzzy string searching (also known as approximate string matching) we identify those strings which are similar to a set of other strings. A number of conclusions can be drawn from these like Similarity co-efficient, similar words etc, etc.

The problem of approximate string matching is typically divided into two sub-problems: finding approximate sub-string matches inside a given string and finding dictionary strings that match the pattern approximately.

Fuzzy search algorithms (also known as similarity search algorithms) serve as a base for spell-checkers and search engines like Google or Bing or Yahoo etc. For example, these algorithms are used to provide the "Did you mean ..." functionality that is very common.

Example :- 

If you ask a machine to find the similarity between two words and correct them if required, say, "Looks" and "Lookes", the machine will return true for the first string "Looks" as its correct and will return the corrected string as "Looks" from the erroneous string "Lookes".

Simple Formulation of Fuzzy String Problems :-

"Find in the text or dictionary of a finite size n for all the words that match a word given as input (or starts with the given word), taking into account m possible differences (errors)."

Fuzzy search algorithms are characterized by metric - a function of distance between two words, which provides a measure of their similarity. A strict mathematical definition of metric includes a requirement to meet triangle inequality (p - metric function, Z - a set of words):

[Image: dbh35lX.png]

LaTeX code for above equation.


p(x,y)  \leq p(x,k) + p(k,y), where,  (x,y,k)  \varepsilon  Z

What is Edit-Distance ?

Definition From Wikipedia

Edit distance is a way of quantifying how dissimilar two strings (e.g., words) are to one another by counting the minimum number of operations required to transform one string into the other. Edit distances find applications in natural language processing, where automatic spelling correction can determine candidate corrections for a misspelled word by selecting words from a dictionary that have a low distance to the word in question.
Simply we can say that - The closeness of a match is measured in terms of the number of primitive operations necessary to convert the string into an exact match. This number is called the edit distance between the string and the pattern.

The primitive operations performed are, Insertion, Deletion, Substitution
. Example :- 

1. Mad -- > Made, Insertion Operation Performed
2. Loooks -- > Looks, Deletion Operation Performed
3. Lick -- > Sick, Substitution Operation Performed

Now we will move to discuss the algorithms.


Damerau-Levenshtein Distance

Damerau-Levenshtein Distance is a distance (string metric) between two Strings, say String A and String B, which gives the minimum number of edit operations need to perform to transform String A to String B. Damerau's Algorithm can be used for spell correction with atmost 1 edit-distance.

There are four edit operations that can be performed with this algorithm. They are - 1. Insertion, 2. Deletion, 3. Substitution, and 4. Transposition. We have already seen the operation of the first three algorithms and so let me explain the last operation, that is transposition.

Transposition is the swapping of adjacent characters to bring them to a certain form.
Example :-

String A := olko
String B := look

When the above two strings are feed to a machine that computes the Damerau-Lavenshtein Distance find that the edit distance is two. 

So how it operates ?
We have two string transpositions here :-

1.) olko -> loko 
2.) loko -> look

Hence we get the final result as :- look
And the number of edits performed is : 2

Please Note that Damerau-Levenshtein Distance doesn't follow the Triangle inequality. You can see that in the image below :-

[Image: MnpRetD.jpg]

"All Theory and No Code Makes Psycho a Dull guy"

I am giving the working function for now. You can see the Psuedo code on Wiki, its is well written.

Here's the code in Python. I would encourage you to write it by yourself too.
def damerau_levenshtein(s1, len_s1, s2, len_s2):
    """
    A function to calculate the Damerau-Levenshtein Distance.

    :param s1: Parent String
    :param len_s1: Length Of s1
    :param s2: pattern String
    :param len_s2: length of s2
    :rtype : int returns the damerau-levenshtein distance
    """

    d = {}
    len_s1 = len(s1)
    len_s2 = len(s2)
    for i in range(-1, len_s1 + 1):
        d[i, -1] = i + 1
    for j in range(-1, len_s2 + 1):
        d[-1, j] = j + 1

    for i in range(len_s1):
        for j in range(len_s2):
            if s1[i] == s2[j]:
                cost = 0
            else:
                cost = 1
                
            d[(i, j)] = min(
                d[i - 1, j] + 1,  # Deletion
                d[i, j - 1] + 1,  # Insertion
                d[i - 1, j - 1] + cost,  # Substitution
            )

            if i and j and s1[i] == s2[j - 1] and s1[i - 1] == s2[j]:
                d[i, j] = min(d[i, j], d[i - 2, j - 2] + cost)  # transposition
    return d[len_s1 - 1, len_s2 - 1]


You can get the complete source code here : https://github.com/AnimeshShaw/TextMin...nshtein.py
To see the Code in Execution :- http://code.hackerearth.com/0356acE
You can visualize how the steps or the algorithm works here : Click Me

Levenshtein Distance

Levenshtein distance is also a string metric calculate the edit-distance between two strings. They have found a lot of applications and in most of the real world systems an efficient and modified form of Levenshtein distance is used including various NLP toolkits like LingPipe or NLTK. or GATE. They use different data structures which reduces the time complexity.

The only difference between Lavenshtein and Damerau-Lavenshtein is that this algorithm doesn't supports transposition and we have only can perform only three operations namely, insertion, deletion and substitution.

Mathematically, it can be written as :-

[Image: W82K5YX.jpg]

LaTeX code for above equation

\qquad\operatorname{lev}_{s,t}(i,j) = \begin{cases}
  \max(i,j) \text{ if} \min(i,j)=0, \\
  \min \begin{cases}
          \operatorname{lev}_{s,t}(i-1,j) + 1 \\
          \operatorname{lev}_{s,t}(i,j-1) + 1 \\
          \operatorname{lev}_{s,t}(i-1,j-1) + 1_{(s_i \neq t_j)}
       \end{cases} \text{ else,}
\end{cases}

Another significant difference between Levenshtein Distance and Damerau-Levenshtein Distance is that the former satisfies the Triangle Inequality whereas the latter does not. It is visible from the image given below where the numbers represent the edit distance between two nodes :-
[Image: 9aRw1lA.jpg]

Okay, lets do some programming now. We can follow the above math relation an we can formulate a recursive solution :-

def recursivelevenshtein(s1, len_s1, s2, len_s2):
    """
    A function to calculate the Levenshtein Distance using recursion.

    :param s1: Parent String
    :param len_s1: Length Of s1
    :param s2: pattern String
    :param len_s2: length of s2
    :rtype : int returns the levenshtein distance
    """
    if len_s1 == 0:
        return len_s2
    if len_s2 == 0:
        return len_s1
    return min(
        recursivelevenshtein(s1, len_s1 - 1, s2, len_s2) + 1,  # Deletion
        recursivelevenshtein(s1, len_s1, s2, len_s2 - 1) + 1,  # Insertion
        recursivelevenshtein(s1, len_s1 - 1, s2, len_s2 - 1) + (s1[len_s1 - 1] != s2[len_s2 - 1])  # Substitution
    )

Full Source :- https://github.com/AnimeshShaw/TextMin...nshtein.py
See Execution :- http://code.hackerearth.com/4ac2f4u

(I haven't given the visualize python link here, but you can do it by yourself)

I hope you understood the process. But this backtracking technique is very very inefficient for larger strings. As the complexity is cubic. The space complexity is large. In order to improve the performance we use the Wagner-Fisher algorithm.

Wagner-Fisher Algorithm
Wagner-Fisher algorithm presents before us a Dynamic Programming approach to solve the Levenshtein Distance Problem in Quadratic time, O(m * n) where m and n are the length two input strings respectively.

Lets get to the code already :-

def wagner_fisher(s1, len_s1, s2, len_s2):
    """
    A function to calculate the Levenshtein Distance using
    Wagner-Fisher Algorithm.

    :param s1: Parent String
    :param len_s1: Length Of s1
    :param s2: pattern String
    :param len_s2: length of s2
    :rtype : int returns the levenshtein distance
    """
    d = {}

    #Make to use O(min(n,m)) space
    if len_s1 > len_s2:
        s1, s2 = s2, s1
        len_s1, len_s2 = len_s2, len_s1
    for i in range(-1, len_s1 + 1):
        d[(i, -1)] = i + 1
    for j in range(-1, len_s2 + 1):
        d[(-1, j)] = j + 1

    for i in range(len_s1):
        for j in range(len_s2):
            if s1[i] == s2[j]:
                d[i, j] = d[i - 1, j - 1]
            else:
                d[(i, j)] = min(
                    d[(i - 1, j)] + 1,  # deletion
                    d[(i, j - 1)] + 1,  # insertion
                    d[(i - 1, j - 1)] + 1,  # substitution
                )
    return d[len_s1 - 1, len_s2 - 1]

Full Source :- https://github.com/AnimeshShaw/TextMin...-Fisher.py
See Execution :- http://code.hackerearth.com/75dc9aJ

(I haven't given the visualize python link here, but you can do it by yourself)

Lets See how the lookup matrix is generated for the strings : "LAD" and "LLUDO"
Here's the final Matrix, just follow the algorithm step[ by step and you should get the following matrix, if you don't then you have made some mistakes.


+------+---+---+---+---+
| S1 → |   | L | A | D |
+------+---+---+---+---+
| S2 ↓ | 0 | 1 | 2 | 3 |
+------+---+---+---+---+
| L    | 1 | 0 | 1 | 2 |
+------+---+---+---+---+
| L    | 2 | 0 | 1 | 2 |
+------+---+---+---+---+
| U    | 3 | 1 | 1 | 2 |
+------+---+---+---+---+
| D    | 4 | 2 | 2 | 2 |
+------+---+---+---+---+
| O    | 5 | 3 | 3 | 3 |
+------+---+---+---+---+
The bottom-right element gives the Levenshtein edit distance. This process is better than recursive. Now my question to you is that, Can we improve further. Well I leave this to you. Find a method and write a code to find the edit distance using this algorithm which performs better than the present algorithm. Comment in the section below.

Using NLTK

If you're using NLTK the you can calculate it using :-

Conclusion

So, all folks we have come to an end of our first encounter with text Processing. If you made it till the end you probably have understood a nice algorithm. I will be posting more articles on these topics as soon as I have time. If you have some doubt then please ask but before that go through the tutorial properly and execute the codes by yourself and practice them by yourself.

References

http://en.wikipedia.org/wiki/Levenshtein_distance
http://en.wikipedia.org/wiki/Wagner-Fischer_algorithm
http://en.wikipedia.org/wiki/Fuzzy_string_searching
http://en.wikipedia.org/wiki/Damerau%E2%...n_distance
https://www8.cs.umu.se/kurser/TDBA77/VT0...NODE46.HTM

Online Tools Used

Online LaTeX : http://www.sciweavers.org/free-online-latex-equation-editor
Draw Diagrams : https://www.draw.io/
Text Table Generator : http://www.tablesgenerator.com/text_tables

Credits to @XxGreenLanternxX to header banner image.


Thank you,
Sincerely,
Psycho_Coder.

Continue Reading →

Saturday, June 20, 2015

Scraping List of all Mangas with Link in Python

Snapshot of a text file saved under the comma-...
Snapshot of a text file saved under the comma-separated value format (Photo credit: Wikipedia)
I wrote a little script that scrapes all the Manga names and their respective homepage URLs as a CSV file.

Here's the code :-

from lxml.html import parse

__author__ = 'Psycho_Coder'


def main():
    with open("mangalist.csv", "w") as f:
        tree = parse("http://www.mangapanda.com/alphabetical")
        manga_name_list = tree.xpath("//ul[@class='series_alpha']/li/a/text()")
        manga_url_list = tree.xpath("//ul[@class='series_alpha']/li/a/@href")
        f.write("\"Manga Name\", URL\n")

        for i in range(len(manga_name_list)):
            f.write("\"{0}\", http://www.mangapanda.com{1}\n".format(manga_name_list[i].replace("\"", ""), manga_url_list[i]))

if __name__ == "__main__":
    main() 

CSV : https://github.com/AnimeshShaw/MangaScrapper/blob/master/resources/mangalist.csv
Code On Github https://github.com/AnimeshShaw/MangaScrapper/blob/master/resources/MangaList.py


I hope you liked this script. Please share this post in your social network :)

Continue Reading →

Follow Me!

Followers

Visitor Map