Thursday, April 6, 2017
Tuesday, March 28, 2017
Saturday, March 25, 2017
Friday, December 2, 2016
Wednesday, November 30, 2016
Monday, November 28, 2016
Friday, October 2, 2015
Python | Simple PyQt5 GUI example with QSS Styling
Hello All,
I started reading about PyQt I decide to try the framework. Till now I had only worked with Java Swing. But after trying I seriously think that I might forget using Java Swing. I loved using PyQt5 since it is very easy and quite powerful, fast, and flexible. It does have more GUI features than Java (I don't know but with my experience in Java, I find Qt to be more mature.)
Since I have moved to Python 3.4 and hence decided to use the latest version and that is PyQt5 instead of PyQt4.
Today I will give you a little snippet that I wrote just as a part of learning the framework. I can't tell much about the efficiency of my code since I have very less experience with Python and Qt. So, if someone more experienced will comment or criticize my code then I am always open and would be very happy as well.
To develop this little GUI I used GridLayout and so the GUI and its widgets are adjustable with the base window. I used QSS to design the gui with colors.
QSS : Its a variant of CSS with most of the properties intersecting with CSS styles and specially designed to work and design the Qt guis and widgets. But instead of HTML tags we use the Widgets class name for styling them, like :- QWidget, QLineEdit, QLabel, QPushButton etc. etc.
QSS is a feature which I loved the most since everything else was pretty much the same with Java Swings.
I started reading about PyQt I decide to try the framework. Till now I had only worked with Java Swing. But after trying I seriously think that I might forget using Java Swing. I loved using PyQt5 since it is very easy and quite powerful, fast, and flexible. It does have more GUI features than Java (I don't know but with my experience in Java, I find Qt to be more mature.)
Since I have moved to Python 3.4 and hence decided to use the latest version and that is PyQt5 instead of PyQt4.
Today I will give you a little snippet that I wrote just as a part of learning the framework. I can't tell much about the efficiency of my code since I have very less experience with Python and Qt. So, if someone more experienced will comment or criticize my code then I am always open and would be very happy as well.
To develop this little GUI I used GridLayout and so the GUI and its widgets are adjustable with the base window. I used QSS to design the gui with colors.
QSS : Its a variant of CSS with most of the properties intersecting with CSS styles and specially designed to work and design the Qt guis and widgets. But instead of HTML tags we use the Widgets class name for styling them, like :- QWidget, QLineEdit, QLabel, QPushButton etc. etc.
QSS is a feature which I loved the most since everything else was pretty much the same with Java Swings.
Screenshot
![[Image: H7uLJPu.png]](https://lh3.googleusercontent.com/blogger_img_proxy/AEn0k_v6bJf-O4fnfGzq6fPRfYLMa5XFQdG7LfjhiX8fTbeYmnnY9CBo2-8bprJ6jP3nyqaP8UgbPOCr-edc1Vj73Q0Y=s0-d)
QSS File Code
QWidget {
   background-color: #222222;
}

QLineEdit {
   background-color: aliceblue;
   color: #618b38;
   font-style: italic;
   font-weight: bold;
}

QLabel {
   background-color: #222222;
   color: #618b38;
}

QPushButton {
   background-color: #8b0000;
   color: #ffffff;
   border-radius: 5px;
   border-style: none;
   height: 25px;
}
Code for GUI
from PyQt5 import QtCore, QtWidgets

__author__ = "Psycho_Coder"


# noinspection PyUnresolvedReferences
class MainUiWindow(object):

   def __init__(self):

       #Main Window
       self.centralwidget = QtWidgets.QWidget(MainWindow)

       """
       Using Grid Layouts for Widgets Alignment
       """
       #Grid Layout for Main Grid Layout
       self.maingrid_layout = QtWidgets.QGridLayout(self.centralwidget)

       #Grid Layout for Result Section Layout
       self.resultgird = QtWidgets.QGridLayout()

       #Grid Layout for Information section
       self.infogrid = QtWidgets.QGridLayout()

       #Grid Layout for holding all the widgets in place
       self.outergrid = QtWidgets.QGridLayout()

       #Button to clear all test input
       self.clearall = QtWidgets.QPushButton(self.centralwidget)

       #Button to show the final result by append
       self.showres = QtWidgets.QPushButton(self.centralwidget)

       #Horizontal layout to hold the result section horizontally
       self.horizontal_layout = QtWidgets.QHBoxLayout()

       """
       Show results widgets
       """
       self.fullname = QtWidgets.QLabel(self.centralwidget)
       self.result = QtWidgets.QLabel(self.centralwidget)

       """
       Get Names info section
       """
       self.firstname = QtWidgets.QLabel(self.centralwidget)
       self.lastname = QtWidgets.QLabel(self.centralwidget)

       #TextBox to get user input
       self.fname = QtWidgets.QLineEdit(self.centralwidget)
       self.lname = QtWidgets.QLineEdit(self.centralwidget)

   def init_gui(self, MainWindow):

       MainWindow.setObjectName("MainWindow")

       MainWindow.setStyleSheet(open("style.qss", "r").read())
       MainWindow.setAutoFillBackground(True)
       MainWindow.resize(328, 166)

       self.centralwidget.setObjectName("centralwidget")

       self.maingrid_layout.setObjectName("maingrid_layout")
       self.outergrid.setObjectName("outergrid")
       self.infogrid.setObjectName("infogrid")

       self.firstname.setObjectName("firstname")
       self.infogrid.addWidget(self.firstname, 0, 0, 1, 1)

       self.fname.setObjectName("fname")
       self.infogrid.addWidget(self.fname, 0, 1, 1, 1)

       self.lastname.setObjectName("lastname")
       self.infogrid.addWidget(self.lastname, 1, 0, 1, 1)

       self.lname.setObjectName("lname")
       self.infogrid.addWidget(self.lname, 1, 1, 1, 1)

       self.outergrid.addLayout(self.infogrid, 0, 0, 1, 1)

       self.fullname.setObjectName("fullname")

       self.result.setMaximumSize(QtCore.QSize(140, 16777215))
       self.result.setObjectName("result")

       self.resultgird.setObjectName("resultgird")
       self.resultgird.addWidget(self.fullname, 0, 0, 1, 1)
       self.resultgird.addWidget(self.result, 0, 1, 1, 1)

       self.outergrid.addLayout(self.resultgird, 1, 0, 1, 1)

       self.showres.setObjectName("showres")
       self.clearall.setObjectName("clearall")

       self.horizontal_layout.setObjectName("horizontal_layout")
       self.horizontal_layout.addWidget(self.showres)
       self.horizontal_layout.addWidget(self.clearall)

       self.outergrid.addLayout(self.horizontal_layout, 2, 0, 1, 1)
       self.maingrid_layout.addLayout(self.outergrid, 0, 0, 1, 1)

       MainWindow.setCentralWidget(self.centralwidget)

       self.retranslate_gui(MainWindow)

       #Add signals of clear to LineEdit widgets to clear the texts
       self.clearall.clicked.connect(self.result.clear)
       self.clearall.clicked.connect(self.lname.clear)
       self.clearall.clicked.connect(self.fname.clear)
       self.showres.clicked.connect(self.__name)

       QtCore.QMetaObject.connectSlotsByName(MainWindow)

   def __name(self):
       name = self.fname.text() + " " + self.lname.text()
       self.result.setText("" + name + "")

   def retranslate_gui(self, MainWindow):
       _translate = QtCore.QCoreApplication.translate

       MainWindow.setWindowTitle(_translate("MainWindow", "Name Concatenation"))
       self.lastname.setText(_translate("MainWindow", "Last Name :"))
       self.firstname.setText(_translate("MainWindow", "First Name :"))
       self.fullname.setText(_translate("MainWindow", "Concatenated Name :-"))
       self.result.setText(_translate("MainWindow", ""))
       self.showres.setText(_translate("MainWindow", "Show Name!"))
       self.clearall.setText(_translate("MainWindow", "Clear All"))

if __name__ == "__main__":
   import sys
   app = QtWidgets.QApplication(sys.argv)
   MainWindow = QtWidgets.QMainWindow()
   ui = MainUiWindow()
   ui.init_gui(MainWindow)

   MainWindow.show()
   sys.exit(app.exec_())
I hope you like this short snippet (not short I guess :troll:) and
probably you learnt a bit by observation how to design GUIs and use
layouts properly and how the hierarchy should be followed. Share this post. Thank you.
Sunday, September 20, 2015
Python CodeHack | ROT13 function in different ways
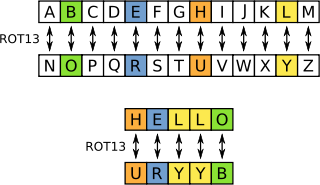
"ROT13 ("rotate by 13 places", sometimes hyphenated ROT-13) is a simple letter substitution cipher that replaces a letter with the letter 13 letters after it in the alphabet. ROT13 is a special case of the Caesar cipher, developed in ancient Rome." -- Wikipedia
In this post I will share the different ways to encode a string using ROT13 in Python, or better say in how mane ways you can do so in Python. We will show three ways to perform ROT13.
1. First Approach
import string

def rot13(text):
   if isinstance(text, str):
       rot13 = string.maketrans("ABCDEFGHIJKLMabcdefghijklmNOPQRSTUVWXYZnopqrstuvwxyz",
                                "NOPQRSTUVWXYZnopqrstuvwxyzABCDEFGHIJKLMabcdefghijklm")

       return string.translate(text, rot13)
   else:
       raise ValueError("The parameter must be a string.")
2. Second Approach
But the problem with the above solution is that maketrans was removed in Python3. Instead we can use bytes.maketrans() for the purpose, so in order to obtain a more generalised solution we can do it as follows :-
import string
import sys


def rot13(text):
    if isinstance(text, str):
        if sys.version[0] == "2":
            rot13_data = string.maketrans("ABCDEFGHIJKLMabcdefghijklmNOPQRSTUVWXYZnopqrstuvwxyz",
                                          "NOPQRSTUVWXYZnopqrstuvwxyzABCDEFGHIJKLMabcdefghijklm")
            return string.translate(text, rot13_data)
        elif sys.version[0] == "3":
            rot13_data = bytes.maketrans(b"ABCDEFGHIJKLMabcdefghijklmNOPQRSTUVWXYZnopqrstuvwxyz",
                                         b"NOPQRSTUVWXYZnopqrstuvwxyzABCDEFGHIJKLMabcdefghijklm")
        return text.translate(rot13_data)
    else:
        raise ValueError("The parameter must be a string.")
You can simple send your rot13 cipher/plaintext and it will encode or decode accordingly.
3. Third Approach
Another better technique is to use codecs module and use the in built rot_13 encoding scheme which is the same. Also its more preferable.
import codecs

cipher = codecs.encode("Natsu Dragneel", "rot_13")
print(cipher)

plain = codecs.decode(cipher, "rot_13")
print(plain)
Python Code for Maximum Sum Subarray Problem
Sunday, September 20, 2015 Algorithms, Code Library, Data Structure, Programming, Python No comments 
"In computer science, the maximum subarray problem is the task of finding the contiguous subarray within a one-dimensional array
of numbers (containing at least one positive number) which has the
largest sum. For example, for the sequence of values −2, 1, −3, 4, −1,
2, 1, −5, 4; the contiguous subarray with the largest sum is 4, −1, 2,
1, with sum 6." --Wikipedia
A linear time solution was proposed by Jay Kadane and was hence forth named as Kadane's Algorithm. The algorithm paradigm followed is Dynamic Programming. Here I have given you the python code for this problem.
Thursday, September 17, 2015
Must See | TEDx Talks Related to Computer Science, IT, and Technology
TED (http://www.ted.com/)
Talks are very very inspiring for anyone irrespective of their
religion, caste, age, education, position, relation, etc. The talks are
given by high profile people that include, Scientists, Sociologist,
Researchers, Philosophers, World leaders, professors etc.
These talks are in depth analysis of truth and science, Philosophy and belief, also the lectures varies vividly and ranges in a great span of subjects or topics or issues. In this post I have listed the very best TEDx Talks which have inspired me, these videos are very exciting and motivational. So I hope you enjoy!
These talks are in depth analysis of truth and science, Philosophy and belief, also the lectures varies vividly and ranges in a great span of subjects or topics or issues. In this post I have listed the very best TEDx Talks which have inspired me, these videos are very exciting and motivational. So I hope you enjoy!
I hope you like the video collection. I will update this post soon. If you have a link you would like to see in the above collection then please comment below and they will be added if appropriate.


Monday, September 14, 2015
FAIDDS | Forensic Acquisition Information and Drive Data Script
Monday, September 14, 2015 Computer Forensics, DFIR, Information Security, InfoSec, Python, Security No comments
Forensic Acquisition Information and Drive Data Script
The script provides a simple way to gather drive information and acquire a drive from a specified device file to the
local directory. For this script to work you must run it as Administrator.
Use the -d argument to specify the device or file path. Using -lh you can get the list of hashes available.
These two options are mutually exclusive.
You can get sample reports in the Sample directory.
Get the Script
You can get the script easily by either downloading the project release, extracting the content and then running the script, alternatively clone the project using Git as shown in the image below.

After you have done so, move to the faidds directory and run the script faidds.py. Follow the example usages stated below for better understanding of how to use the script.
Get the Script
You can get the script easily by either downloading the project release, extracting the content and then running the script, alternatively clone the project using Git as shown in the image below.

After you have done so, move to the faidds directory and run the script faidds.py. Follow the example usages stated below for better understanding of how to use the script.
See all the available options
python faids.py --help

usage: faidds.py [-h] [-d DRIVE] [-D] [-c CHUNK] [-s SERIAL] [-m HASHES] [-lh]
             [-dcfldd]

Forensic Acquisition Information and Drive Data Script. This script provides a
simple way to gather drive information and acquire a drive from a specified
device file to the local directory. For this script to work you must run it as
Administrator. Use the -d argument to specify the device or file path. Using
-lh you can get the list of hashes available. These two options are mutually
exclusive.

optional arguments:
  -h, --help            show this help message and exit
  -d DRIVE, --drive DRIVE
                        Device file to acquire. Example: /dev/sda
  -D, --DEBUG           Debug mode will be activated. All the system calls are
                        printed
  -c CHUNK, --chunk CHUNK
                        Size to split file in GB (1024*1024*1024)
  -s SERIAL, --serial SERIAL
                        User specified serial number. Default is to find
                        serial number in drive info.
  -m HASHES, --hashes HASHES
                        List of hash algorithms to use. Comma separated with
                        no spaces. (default: md5)
  -lh, --list_hashes    List all the Hashes
  -dcfldd, --dcfldd     Use dcfldd to acquire image. (default: dc3dd)
Example Usage
Acquire a drive image and gather information
python faids.py -d /dev/sdb1
Acquire a drive image and get multiple hash results
Write the hashes as Comma separated value.
python faids.py -d /dev/sdb1 -m md5,sha256,sha512
Get list of all available hashes
python faids.py -lh
Available hashes: md5, sha1, sha256, sha384 and sha512
Note
This script was adopted from here. I have refactored it and made it more readable
with a better documentation and I plan to add some more new features later.
The code is hackable and you can add many more new features to the script. I hope you liked this post. Share this post, and leave a comment.
Thank you,
Sincerely,
Psycho_Coder.
Monday, September 7, 2015
[Research Paper] A Heuristic Approach to Factoid Question Generation from Sentence
Monday, September 07, 2015 Artificial Intelligence, Computational Linguistics, NLP, Question Generation No comments

Abstract: Question Generation (QG) and Question Answering (QA) are among the many challenges in natural language generation and natural language understanding. An automated QG system focuses on generation of expressive and factoid questions which assist in meetings, customer helpline, specific domain services, and Educational Institutes etc. In this paper, the proposed system addresses the generation of factoid or wh-questions from sentences in a corpus consisting of factual, descriptive and unbiased details. We discuss our heuristic algorithm for sentence simplification or pre-processing and the knowledge base extracted from previous step is stored in a structured format which assists us in further processing. We further discuss the sentence semantic relation which enables us to construct questions following certain recognizable patterns among different sentence entities, following by the evaluation of question generated.


Sunday, September 6, 2015
Online Hash Generator with PHP Source Code
It's an old little project that I made just to kill time, nothing more. Take the code and hack it in every way you want :D,
![[Image: aOMecsk.png]](https://lh3.googleusercontent.com/blogger_img_proxy/AEn0k_sMPJhfN_6VU_5mP1t87v5bUjU0K5Oyujh5BFluB_e4TLOuGpGu8kj4cQtwML2mcSfSmSV7fuafrJeWRoMj1CFVLg=s0-d)
Result:
![[Image: qN2iBNJ.png]](https://lh3.googleusercontent.com/blogger_img_proxy/AEn0k_v2nRqkUKQfHNBXao6XTpWGNUTKyb3Q9AxFGxaceVA6enDyMjSm9KmlFDSYeiqLD6c1Q_dfVGl7UofJ8dSfHq2R=s0-d)
The Project is OpenSource and hosted on github : https://github.com/AnimeshShaw/Online-Hash-Generator
Before trying it yourself please read the HelpDocs: https://github.com/AnimeshShaw/Online-Hash-Generator/wiki/Help-Docs
Before trying it yourself please read the HelpDocs: https://github.com/AnimeshShaw/Online-Hash-Generator/wiki/Help-Docs
Peter de Jong Attractor in Python
Sunday, September 06, 2015 Attractor, Coding, Fractal, Generative Art, Graphics, Programming, PyGame, Python, Python3 No comments
It's pretty simple and I have specially given the code in python which demonstrates the concept. For details on Attractors please refer wikipedia. I have used the Python pygame module for graphics.
Here's the end result:-
![[Image: GOVr9W9.png]](https://lh3.googleusercontent.com/blogger_img_proxy/AEn0k_uKQ7jEV-pOjIW86mrsw_SJSKSkrf3XdmSGVof2fpJroNxe6ehHVAU2tfj9Ryq5PW1OWiFAsAAJRtDLqYo65V1KHg=s0-d)
Here's the code:
I have used two custom fonts as you can see in the code above. You can get them from here and here. You can use either system font or download two new fonts and put them in the same execution directory. Make sure you edit the code with proper font names.
self.xn, self.yn = ( sin( self.constants["a"] * self.yn ) - cos ( self.constants["b"] \
                                   * self.xn ) ), ( sin( self.constants["c"] * self.xn ) - cos( self.constants["d"] * self.yn ) )
                   #  xn, yn = ( d * sin( a * xn ) - sin ( b * yn ) ), ( c * cos( a * xn ) + cos( b * yn ) )
                   self.coords.append( ( self.xn, self.yn ) )
                   pygame.draw.circle( self.screen, self.grayshade , ( self.width // 2 + \
                                           int( 120 * self.xn ), self.height // 2 + int( 120 * self.yn ) ), 1, 1 )
Changing the constants a,b, c and varying the number of iteration you can create many more custom shapes. So be creative and start hacking!


Saturday, August 29, 2015
Conduit Search Protect Disinfector Tool
Saturday, August 29, 2015 Computer Forensics, Hacking, InfoSec, Malware, Reverse Engineering, Security No comments
ConduitSPKiller v1.0
Description:
Removes Conduit Search Protect (this is not the same as Conduit Toolbar!)
Important! Backup your files and your registry! I take no responsibility if you loose data, because you forget to create backups.
What is Conduit Search Protect?
Conduit Search Protect comes often bundled with installers of other programs, e.g., PowerISO. It is classified as potentially unwanted program (PUP), meaning, no one with a right mind would actually want that on his/her PC.
Conduit Search Protect sets your browser's default home page, new tab settings and search engine to search.conduit.com or http://www.trovi.com.
It is hard to get rid off and blocks any attempts to change the browser settings back. Other symptoms are unwanted pop-up and in-text advertisements.
Conduit Search Protect infected PCs usually have an icon showing a blue shied with a white magnifying class in your taskbar.
Conduit Search Protect can cause severe problems after using the Conduit Uninstaller, it may even render your system unbootable (see link)
Tested on:
This version was only tested for Windows XP so far.
You can use this script for other operating systems as well, however, it is possible that not all remnants can be removed in that case.
Description:
Removes Conduit Search Protect (this is not the same as Conduit Toolbar!)
Important! Backup your files and your registry! I take no responsibility if you loose data, because you forget to create backups.
What is Conduit Search Protect?
Conduit Search Protect comes often bundled with installers of other programs, e.g., PowerISO. It is classified as potentially unwanted program (PUP), meaning, no one with a right mind would actually want that on his/her PC.
Conduit Search Protect sets your browser's default home page, new tab settings and search engine to search.conduit.com or http://www.trovi.com.
It is hard to get rid off and blocks any attempts to change the browser settings back. Other symptoms are unwanted pop-up and in-text advertisements.
Conduit Search Protect infected PCs usually have an icon showing a blue shied with a white magnifying class in your taskbar.
Conduit Search Protect can cause severe problems after using the Conduit Uninstaller, it may even render your system unbootable (see link)
Tested on:
This version was only tested for Windows XP so far.
You can use this script for other operating systems as well, however, it is possible that not all remnants can be removed in that case.
Usage:
- Backup important files
- Backup your registry (e.g. using ERUNT)
- Copy & Paste the source into notepad.
- Save as ConduitSPKiller.bat
- Run.
Note: A command window will pop up and close again. This is quite
normal. The disinfector will selfdestruct, but leave a log.txt in the
current working directory. If you encounter any problems, post that log
file.
Some error messages in the log file are normal.
Source:
https://github.com/Doubleendedqueue/DisinfectionScripts/blob/master/conduitspkiller.bat
Some error messages in the log file are normal.
Source:
https://github.com/Doubleendedqueue/DisinfectionScripts/blob/master/conduitspkiller.bat
Credits for Code and Article: Deque
Monday, July 20, 2015
Bouncing Box animation in Python using PyGame
Bouncy is a class which demonstrates Bouncing rectangle animation which
options like resolution, bouncy rectangle size, speed. Whenever it
collides with the borders or wall it plays a sound. The code doesn't
have any Magic Numbers, everything has been named pretty well so that it
is readable to most and many error handling cases has been handled
(These being the reason that the code is long else it can be reduced).

How to use ?
Just initialize the class with the parameters. if you don't give any params a default value is taken.
Parameters :-
1. resolution : Takes a tuple of values for Screen Size like (800, 600). Default Value : (640, 480)
2. rectobj_size : Takes a tuple of values for rectangle object size like (40, 30). Default Value : (50, 50)
3. speed : Animation Speed. Min value 1
Example :-
Bouncy( ( 600, 400 ), ( 40, 40 ), 5 ) or Bouncy( resolution = ( 600, 400 ), rectobj_size = ( 40, 40 ), speed = 5 )
Code:

How to use ?
Just initialize the class with the parameters. if you don't give any params a default value is taken.
Download the Sound from here : https://mega.co.nz/#!45VTzKxK!vsx-IBhnGNEGvoZMSYdCod_ORMjsfEQ4YxcE3DW8Z28
Parameters :-
1. resolution : Takes a tuple of values for Screen Size like (800, 600). Default Value : (640, 480)
2. rectobj_size : Takes a tuple of values for rectangle object size like (40, 30). Default Value : (50, 50)
3. speed : Animation Speed. Min value 1
Example :-
Bouncy( ( 600, 400 ), ( 40, 40 ), 5 ) or Bouncy( resolution = ( 600, 400 ), rectobj_size = ( 40, 40 ), speed = 5 )
Code:
Subscribe to:Posts ( Atom )
Visitor Map


